Login
EuropaOwners Random Items Generator harness install 1 of 2.
Advanced Search
View Slideshow (Fullscreen)

Random Items

1. Option B)... ... 43. DSCF0625 44. Option B)... 45. DSCF0674 46. Generator... 47. Mock up... 48. Keychain... 49. DSCF0758 ... 84. DSCF0681

Random Images

IMG_5727Ann

IMG_5727Ann

Date: 10/21/2007 Views: 3980

DSCN5328Ann

DSCN5328Ann

Date: 12/24/2006 Views: 4109

DSCF0010_005

DSCF0010_005

Date: 10/26/2009 Views: 4346

Newest Image

EAA SITE

EAA SITE

Date: 08/23/2023 Views: 693446

Most Viewed Image

EAA SITE

EAA SITE

Date: 08/23/2023 Views: 693446

Generator harness install 1 of 2.

1) First order of business is to scratch off the black paint from both sides of the flange where the ground connector will be attached. Once the flange is nice and clean from the black paint, install the ground connector with hardware being only finger tight.

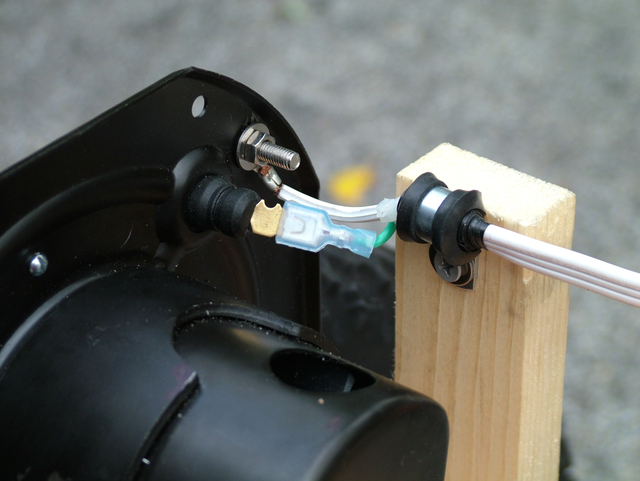
2)Next using pliers, gently crush both sides of the Faston connector to insure there is ample spring tension to make a good electrical connection, then push the Faston onto the 1/4" tab. This is the positive connection to the generator.

3) As per picture 2 of 2 cut a 5' long piece of 1 x 2.

4) Determine the exact location you want to install the Adel clamp and wrap that location with Friction Tape until it is built up in diameter where the clamp will hold the wire. Then using a 1" Sheetrock screw with a washer under the head, screw the clamp to the 1 x 2.

Y11-09-17

Date: 08/12/2003
Size:
Full size: 4048x3040
nextlast
first previous
Generator harness install 1 of 2.

Photo Properties

summary  details
Make FUJIFILM Model FinePix S7000
Aperture Value f/3.1 Color Space sRGB
Exposure Bias Value 0 EV Exposure Program Program
Flash No Flash Focal Length 22 mm
ISO 200 Metering Mode Multi-Segment
Shutter Speed Value 1/190 sec Date/Time Tue 12 Aug 2003 05:44:03 PM UTC
nextlast
first previous
Powered by Gallery v2.3