|
|
dsc09063
Hey Bill!
Date: 01/24/2013
Views: 18976
|
|
|
dsc09064
Bill does nice peel ply work!
Date: 01/24/2013
Views: 19632
|
|
|
|
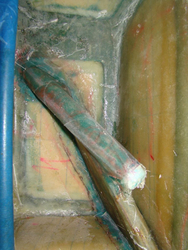
dsc09065
Stbd side peel ply removed.
Date: 01/25/2013
Views: 20727
|
|
|
dsc09066
Port side peel ply removed. Oh notice the caps in the sockets. What I did was take a block of foam and push it down in the socket, then took it back out and covered it with car wax. Once all the ribs are in I'll see how it worked.
Date: 01/25/2013
Views: 21009
|
|
|
|
dsc09067
dsc09067.jpg
Date: 01/25/2013
Views: 20244
|
|
|
dsc09038
To make our backs happy and life 1000% easier we tilted the fuselage. Notice I used my monowheel trailer as a jig. A tow strap 4" wide was used in the rear to hold the tail. This was rock solid.
Date: 01/23/2013
Views: 20968
|
|
|
|
dsc09039
Port side done after cure.
Date: 01/23/2013
Views: 19838
|
|
|
dsc09040
The gap from the bottom of the socket and the belly is as you see. The only way to get it all the way down was to lower the belly to 15" which was not considered an option. Belly hight is 16.0" with the axle width at 82.50" and axle cent
Date: 01/23/2013
Views: 20981
|
|
|
|
dsc09041
Port side guides being placed for layup.
Date: 01/23/2013
Views: 20023
|
|
|
dsc09042
Starboard side being keyed.
Date: 01/23/2013
Views: 18617
|
|
|
|
dsc09044
Port side being keyed.
Date: 01/23/2013
Views: 18917
|
|
|
dsc09045
Uncle Kim at work. We would tilt to starboard to work on the port side vice versa.
Date: 01/23/2013
Views: 22281
|
|
|
|
dsc09046
Making a layup schedule for rib 1.
Date: 01/23/2013
Views: 20428
|
|
|
dsc09047
I took cardboard and bent it around the socket and overlapped per the manual. Then took this cardboard and made a new template for cutouts. This made the layups go really quick.
Date: 01/23/2013
Views: 20175
|
|
|
|
dsc09048
Template for the Stbd side. Note, you are not required per the manual to hook over the plywood with bid.
Date: 01/24/2013
Views: 20546
|
|
|
dsc09049
Layup Port side complete with peel ply. Notice the glad wrap to keep air from getting under the peel ply. 420 = 46g, aeropoxy ~ 200g
Date: 01/24/2013
Views: 20710
|
|
|
|
dsc09050
Stbd. side ready for the bid.
Date: 01/24/2013
Views: 18893
|
|
|
dsc09051
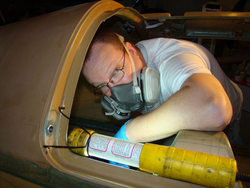
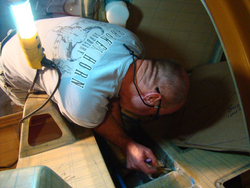
Mix it up Kim! FYI I hate this scale from aircraft spruce, it times out in one min if your plugged in or not. I would have to tap the scale while Kim mixed. We were using masks due to being in an enclosed area and I'm very allergic to the hardener (bumm
Date: 01/24/2013
Views: 20209
|
|
|
|
dsc09052
Wetting out stbd side.
Date: 01/24/2013
Views: 20165
|
|
|
dsc09021
BIG THANK YOU to my Uncle Kim Prout for flying out to help me with getting the gear legs set. He also helped me slow down and plan ahead. As an excited new builder its easy to get in a rush to try achieve something tangible. Im sure after that week of b
Date: 01/22/2013
Views: 20944
|
|