Vertical upright, swing-arm and generator install 1 of 7.
I will describe in detail in these 7 pics. how to size and install the port Bucket vertical uprights, swing-arm and generator.
Variations in bicycle dimensions and your selection of Electrical Box will affect final sizes and positioning.
Please read "all" instructions on these 7 pics before beginning.
1) Select which option of Electrical Box you are going to use.
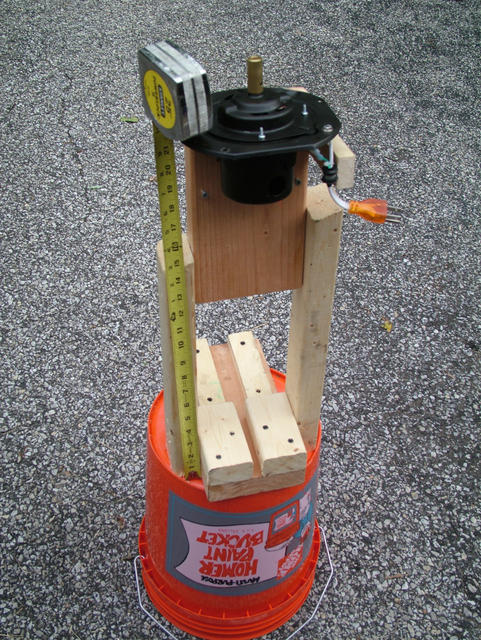
** Option A) will require that the front vertical 2 x 3 upright is cut 1" taller than the swing-arm 2 x 6 (see pic 5 of 7). In order to accommodate the option A) Electrical Box on an angle that allows easy viewing for the pedalee, you must cut this 2 x 3 at a 15 degree angle (the front being lower than the rear) with the rear higher slope of the front upright being 1" above the swing-arm (see pic. 2 of 7). You must take this 1" measurement when the generator spindle is 90 degrees to the tire in both the vertical and horizontal plains when the Buckets are sitting flat and firmly on the ground with the bicycle sitting fully on the 2 x 6s on the tops of the buckets.
Once you have your front upright cut, using two 3" Sheetrock screws that have clearance holes 3/4" in from the sides and central located on the top port bucket 2 x 6, drill pilot holes in the 2 x 6, smear some JB Wood Weld or other glue on the contact area and screw in place making sure it is true and square to the 2 x 6. You want this upright as far outboard on the Bucket as you can with it touching the edge lip of the bucket.
Once the front upright joint is stable, using a 2 x 6 spacer (to insure the aft upright is parallel to the front) take a 2 x 3 and hold it up in the aft position and using a straight edge mark the precise cut line for the rear upright (see pic 2 of 7). Cut the aft upright, drill clearance and pilot holes, apply glue on the contact area and using the 2 x 6 spacer screw in place making sure it is square and true to the bucket 2 x 6 and the front upright.
** Option B) + C) are a bit easier, follow the directions for Option A) except just cut the two vertical uprights at 90 degrees and 1" higher than the swing-arm 2 x 6.
So after the above step you will have two 2 x 3 uprights with only two screws holding them in place.


